I’m amazed that my newsletter has continued to garner subscribers in my absence, and thrilled that so many of you find my writing useful enough to share with your friends. Thanks, as always, for taking the time to read my sometimes cogent thoughts. If there are any subjects you’d like covered, feel free to leave a comment below or reach out to me on discord @Glizzy#3224
A motif is a distinct, repeating idea. Perhaps the most easily recognizable motif comes from Beethoven’s 5th Symphony.
I find this term useful for thinking about positional relationships between players, generally (but not always) in late round situations. Once you begin to recognize that these patterns repeat, and understand how to play them correctly, you will find yourself winning considerably more of your man-up situations. I want to make incredibly clear that utility is not in consideration for these examples, as a single flash or smoke can dramatically change these situations and necessitate different positioning. These examples are purely to illustrate how to maximize your win rate in gun v gun situations with no additional variables
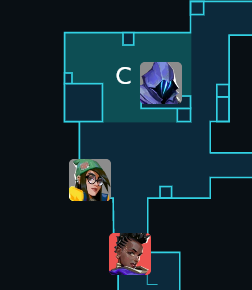
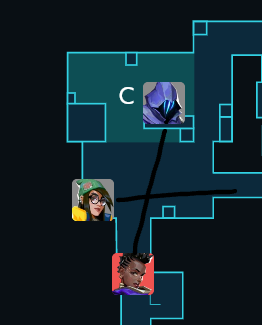
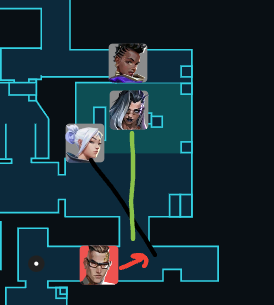
The first motif to discuss is the 90 degree hold. The enemy player must pass through a choke that you and a teammate are holding as such.
As you can see from my beautiful drawing, KJ’s LOS bisects the line drawn between Omen and Astra, creating (rougly) a 90 degree angle between the KJ and Omen
Most of my long-term readers already know how this situation should be played, as I’ve covered it in at least one of my past pieces, but for those of you who are new, ask yourself how you would play the situation as either KJ or Omen. Should you coordinate a double peek? Should Omen peek first, then KJ? Should Omen peek off of KJ’s contact? Should Omen jump spot and bait for a swing from KJ?
The highest percentage play in this situation is for Omen to peek off of KJ’s contact. KJ is too deep to peek off of Omen’s contact, while Omen is positioned perfectly to swing on the Astra when she fights KJ. When you find yourself in one of these situations, ask yourself whether you are the person bisecting the line between friend and enemy (you are the point of contact) or if you are the one who should swing off contact.
How does the situation change when you and your teammate are holding the same bisecting line that the enemy must cross? This is probably the simplest, and most commonly understood motif in the game, the crossfire. All you have to do is NOT SWING OUT to take the fight and you should win the round easily.
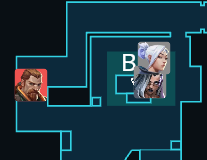
Let’s now take a look at the double hold (or sharing a line). Suppose you and a teammate are covering for a third teammate on the defuse, with full knowledge of the last remaining enemy’s position.
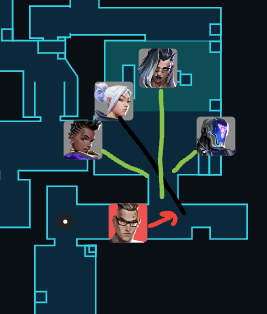
To illustrate this point more clearly, lets shift the players around and add an additional teammate holding 45 degrees off from our Fade. This is, in all likelihood, an easy 4v1 round win. But notice how each player is holding their own line, allowing the enemy Chamber to isolate 1v1s. Not only that, but Astra is holding an irrelevant line (Chamber can kill Jett without exposing himself to Astra).
Rather than take different angles and allow the chamber to isolate fights on his way to dealing with the defuser, try sharing a line with your teammate. Not only are Astra and Fade sharing a line here, but they’re also on an up-down, making an already favorable fight even more difficult for the enemy. This situation, despite having 1 fewer player than the previous, has a higher likelihood of converting the round (especially since Astra is literally useless in the previous scenario), as it relies on the simultaneous failure of two players to gift chamber the win rather than successive failures.
It’s worth noting that up-downs can be created irrespective of map terrain by simply having one player crouch next to one standing straight up, but you should use the map terrain to your advantage whenever possible.
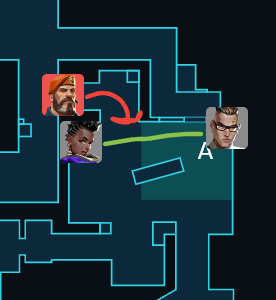
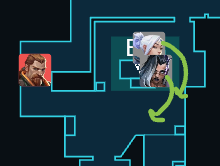
Next, let’s look at the double swing. Suppose you and a teammate are in roughly the same place with knowledge of the enemy’s position. Rather than play passively and give him the opportunity to work his way up and isolate one of you, sometimes it’s best to swing together and guarantee a 2v1 fight.
One small but important detail in these situations is that the player closer to the enemy should swing first, as they will travel farther on the enemy’s screen in the same amount of time, creating more space for their teammate and reducing the chances of a lineup or spraydown.
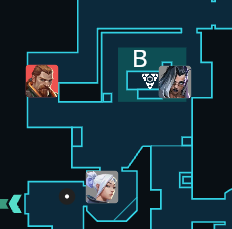
Notice how different the situation below is from the one above. If you’ve been paying attention you’ll recognize this as the same motif as our first scenario and understand how it should be played. Player positioning and the situational objectives dictate how these scenarios should be played. Where does the enemy have to go to win the round? How are you and your teammate positioned relative to that place? If you’re roughly in the same spot you might consider holding the same line or swinging together, depending on context. If one of you is holding an angle that bisects the enemy’s direction of movement the other should play off their contact. If you and your teammate are staring at each other while bisecting the enemy’s direction of movement just hold your crossfire.


